Single Sign-On (SSO) is one of the most common requirements in enterprise Salesforce implementations. Instead of managing separate usernames and passwords across applications, SSO allows users to authenticate once and access multiple systems securely.
In this guide, we’ll walk through a practical step-by-step process to configure Salesforce SSO using SAML, one of the most widely used authentication protocols.
Whether you’re a Salesforce Admin, Developer, or Architect, understanding SSO configuration is an essential skill in enterprise environments.
What is Single Sign-On (SSO)?
Single Sign-On allows users to log in once through a trusted identity provider and then access multiple applications without needing to authenticate again.
For example, a user might log in through an identity provider such as:
Okta
Microsoft Entra ID
Ping Identity
Once authenticated, the user can seamlessly access Salesforce and other connected systems.
How Salesforce SSO Works
Most Salesforce SSO implementations use SAML.
Here’s the high-level flow.
SSO Authentication Flow
User
↓
Attempts to access Salesforce
↓
Salesforce redirects user to Identity Provider
↓
User authenticates with Identity Provider
↓
Identity Provider sends SAML Assertion
↓
Salesforce validates assertion
↓
User is logged into Salesforce
This architecture allows organizations to centralize authentication and improve security.
Prerequisites
Before setting up SSO in Salesforce, ensure the following:
✔ System Administrator access in Salesforce ✔ Identity Provider metadata (from Okta/Azure AD etc.) ✔ SAML certificate from the Identity Provider ✔ Identity Provider Login URL ✔ Entity ID details
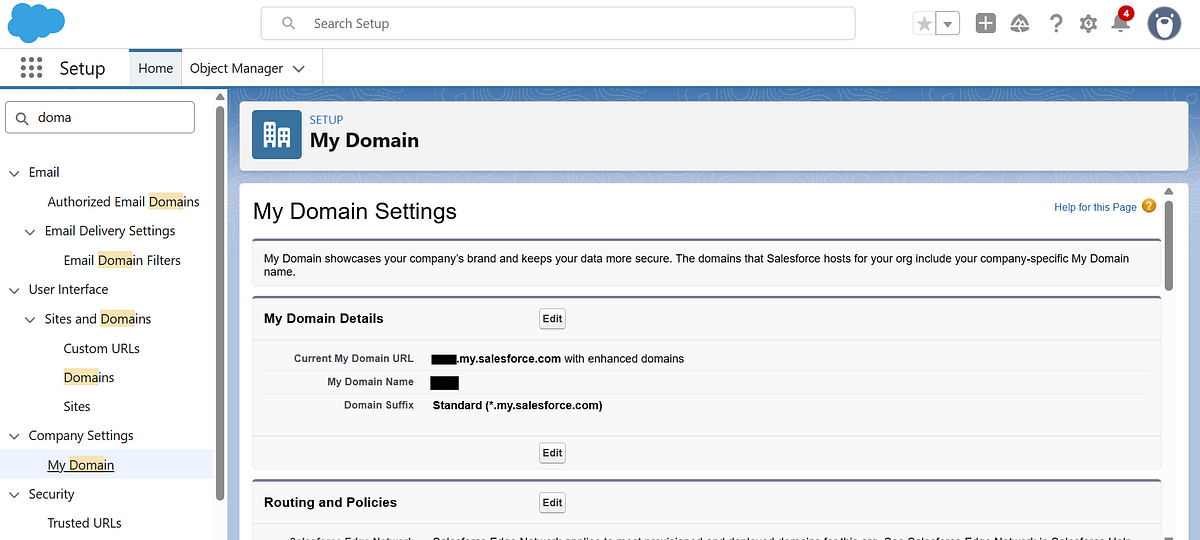
Step 1: Enable My Domain
SSO requires My Domain to be configured in Salesforce.
Navigate to:
Setup → My Domain
Register and deploy your custom Salesforce domain.
Example:
https://yourcompany.my.salesforce.com
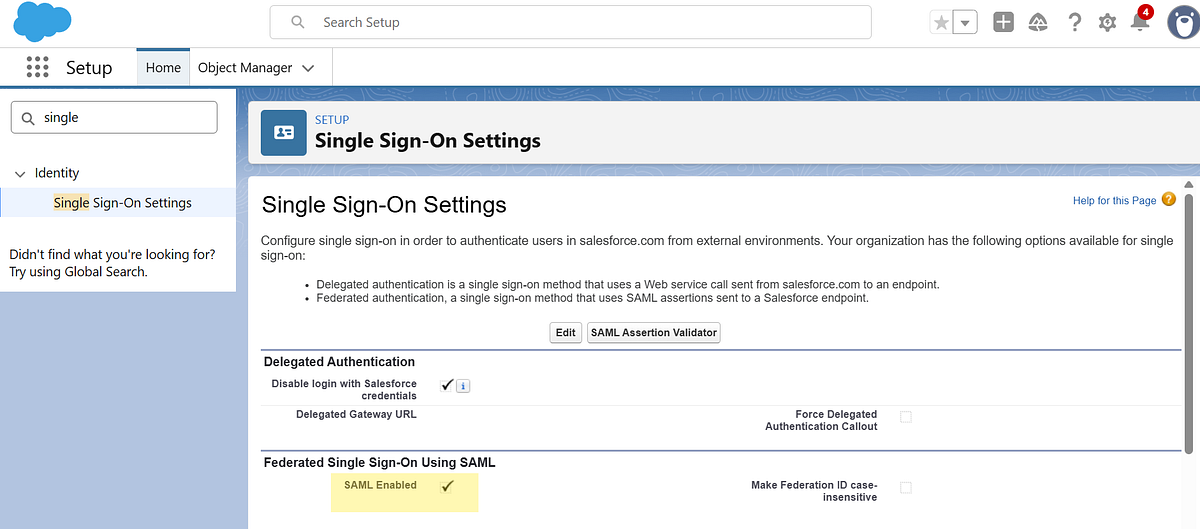
Step 2: Enable SAML Authentication
Navigate to:
Setup → Single Sign-On Settings
Then enable SAML Enabled.
Step 3: Create a New SAML Configuration
Navigate to Single Sign-On Settings and click New to create a new SAML configuration.
You can configure the SAML settings in two ways:
Upload from URL — Provide the metadata URL from your Identity Provider (recommended for automatic updates).
Upload File — Alternatively, upload the metadata XML file manually if you have it downloaded.
Choose the method that best fits your setup, then proceed with the configuration.
Step 4: Configure User Identification
Salesforce must determine which user is logging in.
This is done using the SAML Assertion.
Common identifiers include:
Username
Federation ID
Best practice in enterprise environments is to use Federation ID because it provides flexibility when usernames change. The Federation ID in Salesforce must match the identifier sent by the Identity Provider.
Step 5: Test the SSO Configuration
After saving your SAML configuration, Salesforce provides a Test-Only Initialization URL.
You can find this URL by:
Navigating to Setup → Single Sign-On Settings
Clicking on your newly created SAML configuration
Locating the “Test-Only Initialization URL” field
Use this URL to validate your SSO setup before enabling it for all users. This ensures that authentication is working correctly without impacting existing login flows.
Common Mistakes to Avoid
During SSO setup, these issues frequently occur.
1. Certificate Expiration
Always monitor IdP certificates and renew them before expiration.
2.Federation ID Mismatch
Ensure the identifier in Salesforce matches the SAML assertion.
3.Lockout Risk
Always maintain one non-SSO admin login to avoid being locked out.
Salesforce Data Cloud is built to ingest high-volume, near real-time data from external systems. While native connectors cover many common sources, real-world implementations often require custom, programmatic ingestion.
In this article, we’ll walk through a hands-on example of ingesting data programmatically into Salesforce Data Cloud using the Streaming Ingestion API. The example is intentionally simple but realistic: ingesting device battery status events from an external system.
Note: This article focuses only on the Streaming Ingestion API. Bulk Ingestion API will be covered separately.
Use Case: Tracking Battery Status from Solar Panels
We want to track battery level updates sent periodically by solar panels installed across multiple locations, where each update represents a real-time reading that needs to be captured and stored as an event.
Why Streaming Ingestion API? Because these battery updates arrive continuously in near real time and must be ingested event by event, rather than as large historical batches. Each event contains:
Device ID
Battery level
Event timestamp
High-Level Architecture
External System
   ↓ (REST API call)
Streaming Ingestion API
   ↓
Data Stream
   ↓
Data Lake Object (Raw Events)
Each API call sends a single event into Data Cloud, which is then processed asynchronously.
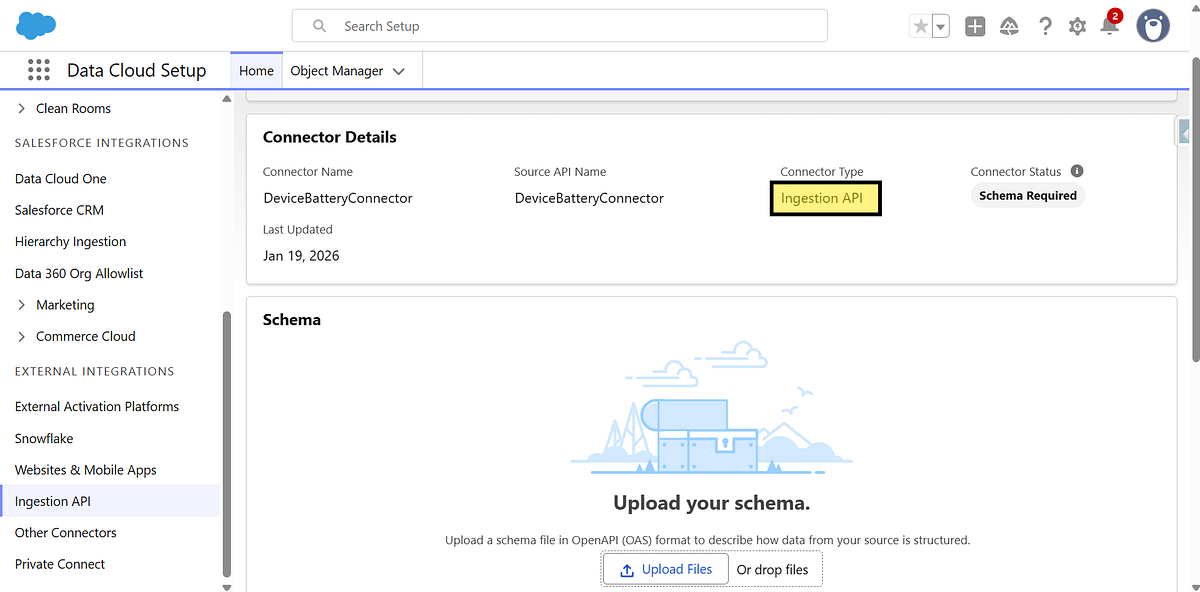
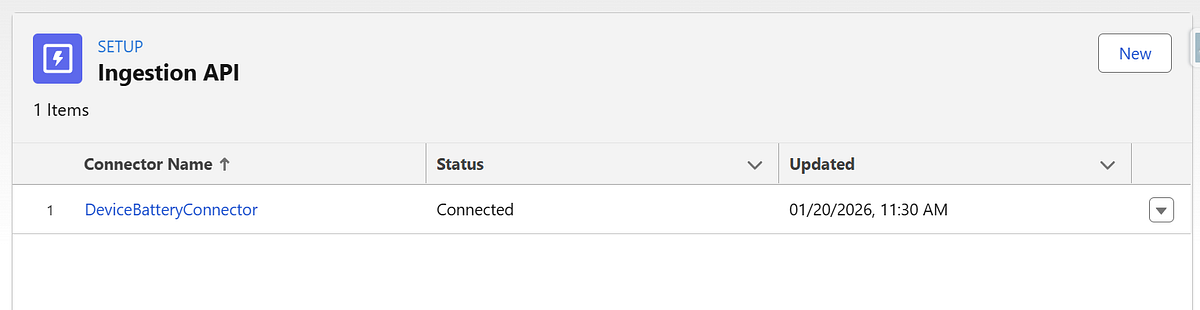
Step 1: Create an Ingestion API Connector
In Salesforce Data Cloud:
Navigate to Data Cloud Set Up → Connectors
Click New
Select Ingestion API
Name the connector (for example: DeviceBatteryConnector)
Why this matters: Each external system should have its own connector. This keeps schemas, ownership, and debugging clean.
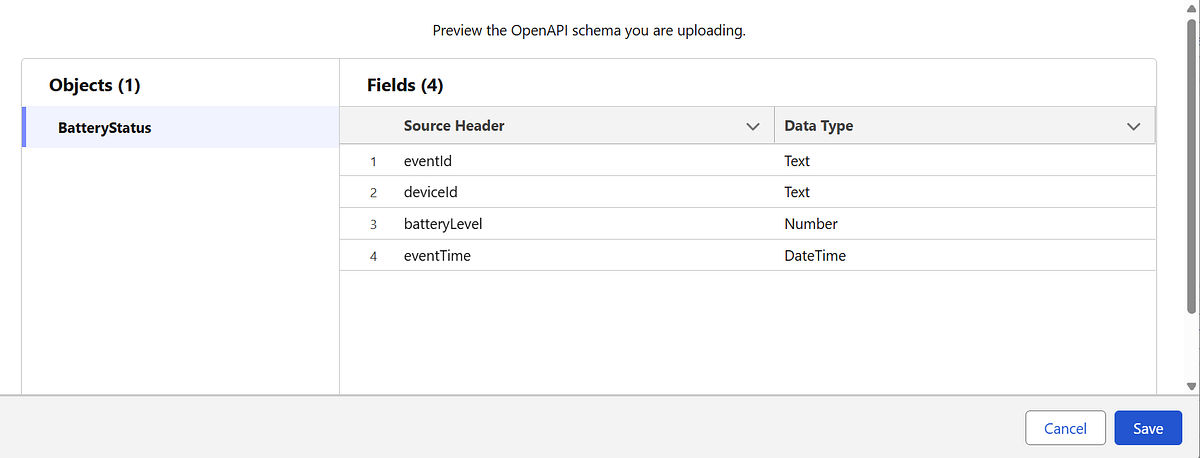
Step 2: Define the Schema (OpenAPI / YAML)
Data Cloud requires a schema to understand the structure of incoming data. This schema becomes the contract between the external system and Data Cloud.
eventTime should represent when the event occurred, not when it was ingested
Streaming ingestion is append-only, so schema design is critical
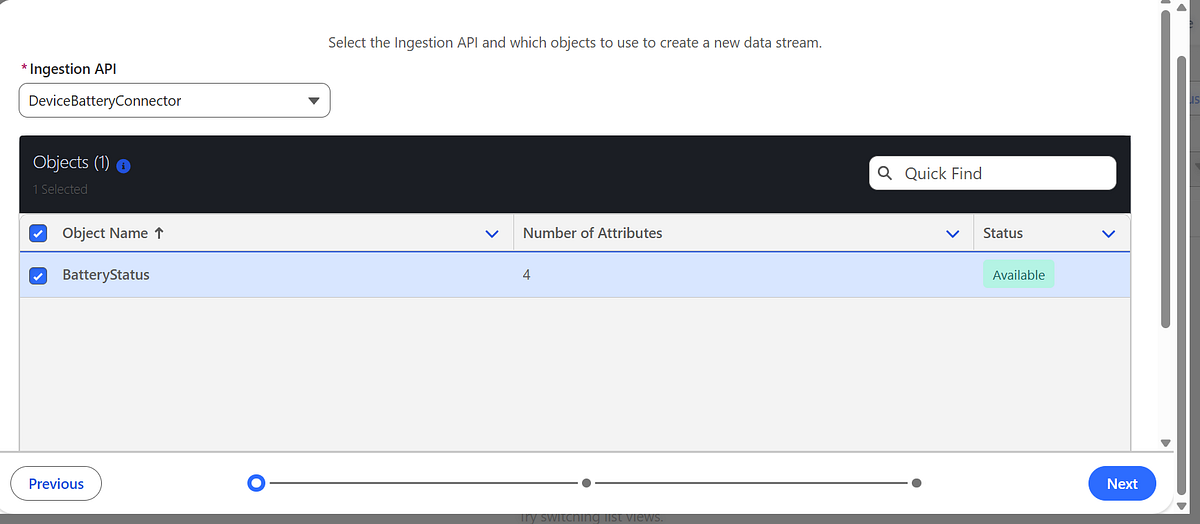
Step 3: Create a Data Stream
Next, create a Data Stream to bind the connector and schema.
Go to Data Cloud → Data Streams
Create a new Data Stream
Select the Ingestion API connector
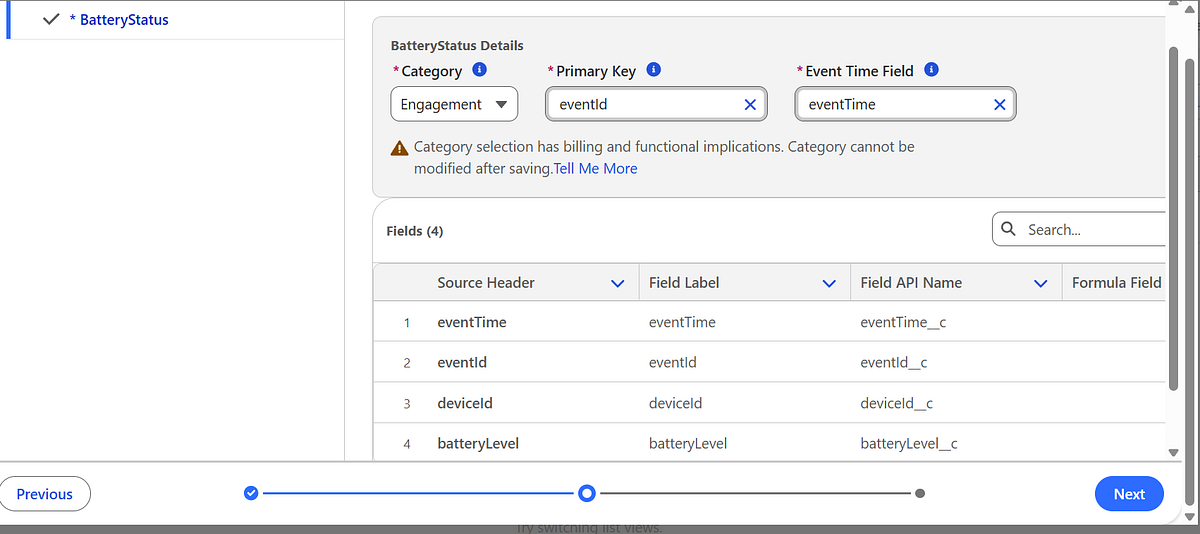
Choose the schema object (BatteryStatus)
Select a category (for example: Engagement)
⚠️ Category selection is irreversible, so choose carefully.
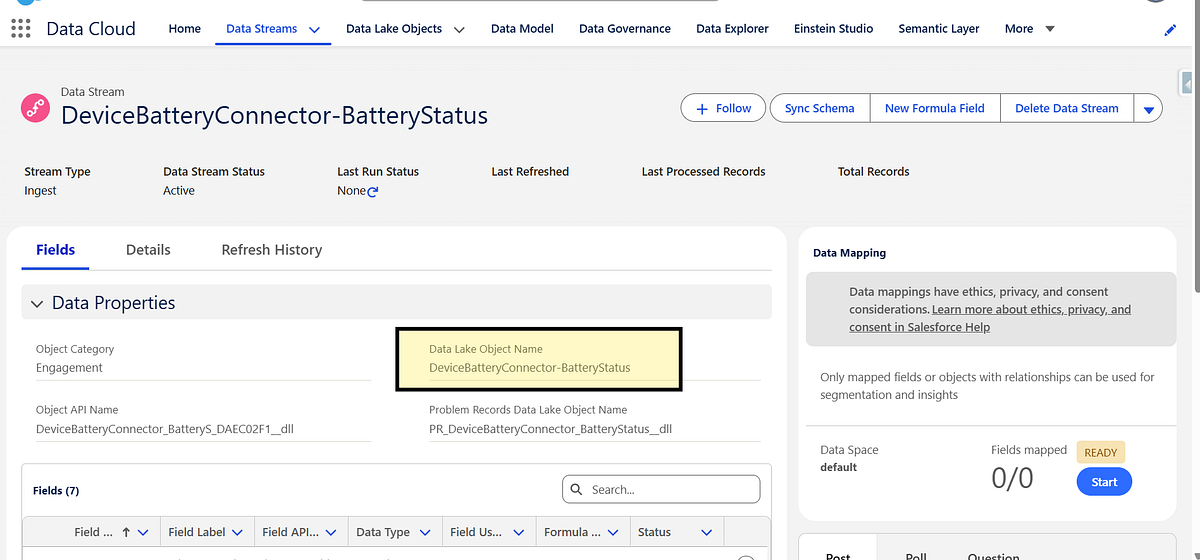
Once deployed, Data Cloud automatically creates a Data Lake Object (DLO) to store the raw events.
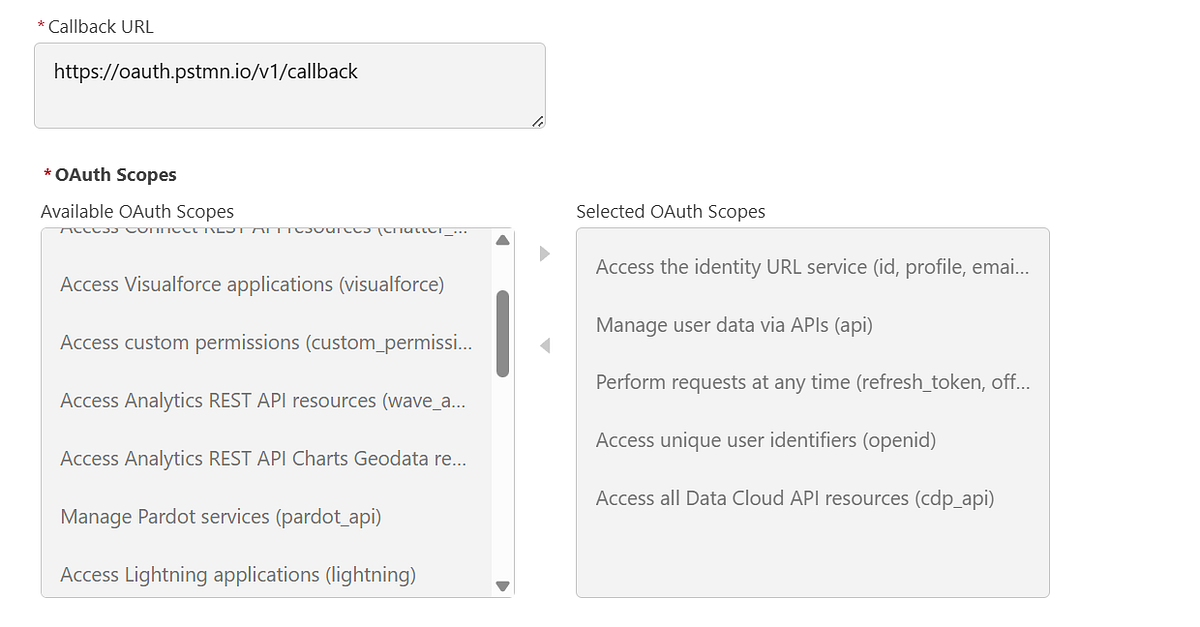
Step 4: Set Up Authentication (Connected App)
The Streaming Ingestion API uses OAuth authentication.
Steps at a high level:
Create a Connected App in Salesforce
Enable OAuth
Assign required Data Cloud scopes
Generate an access token (often referred to as an A360 token)
This token will be passed in the Authorization header for API calls.
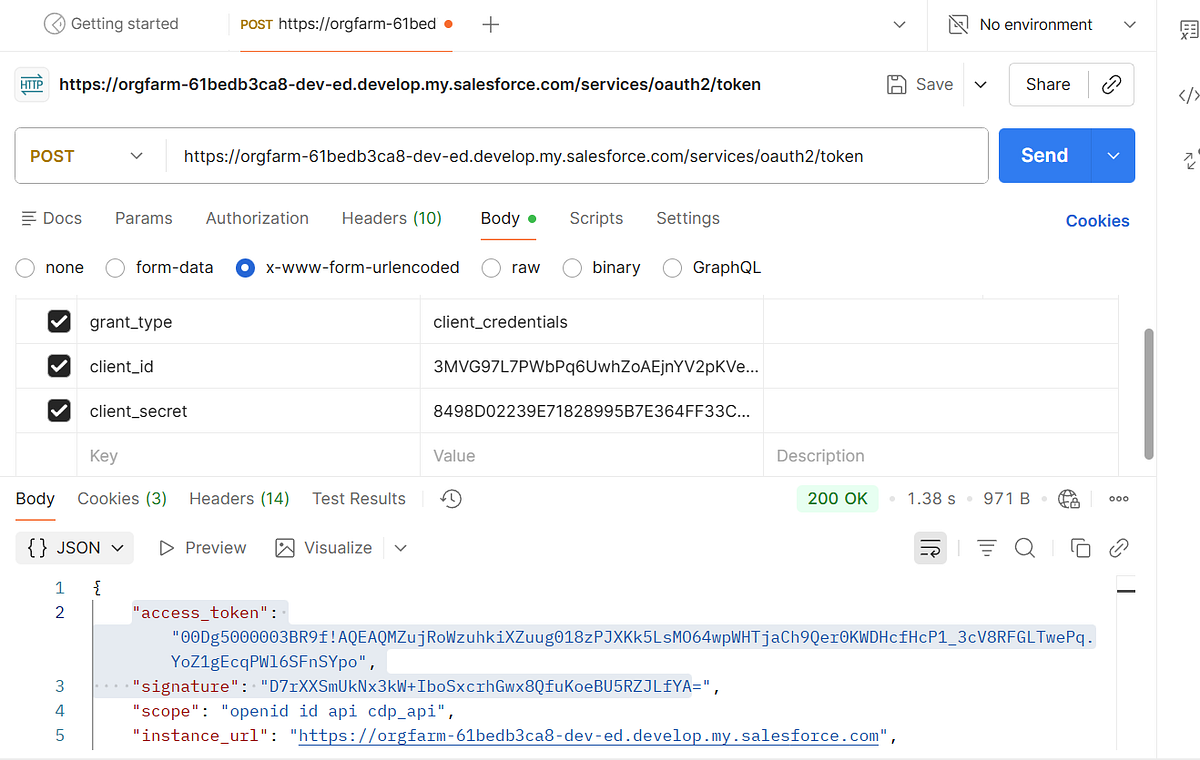
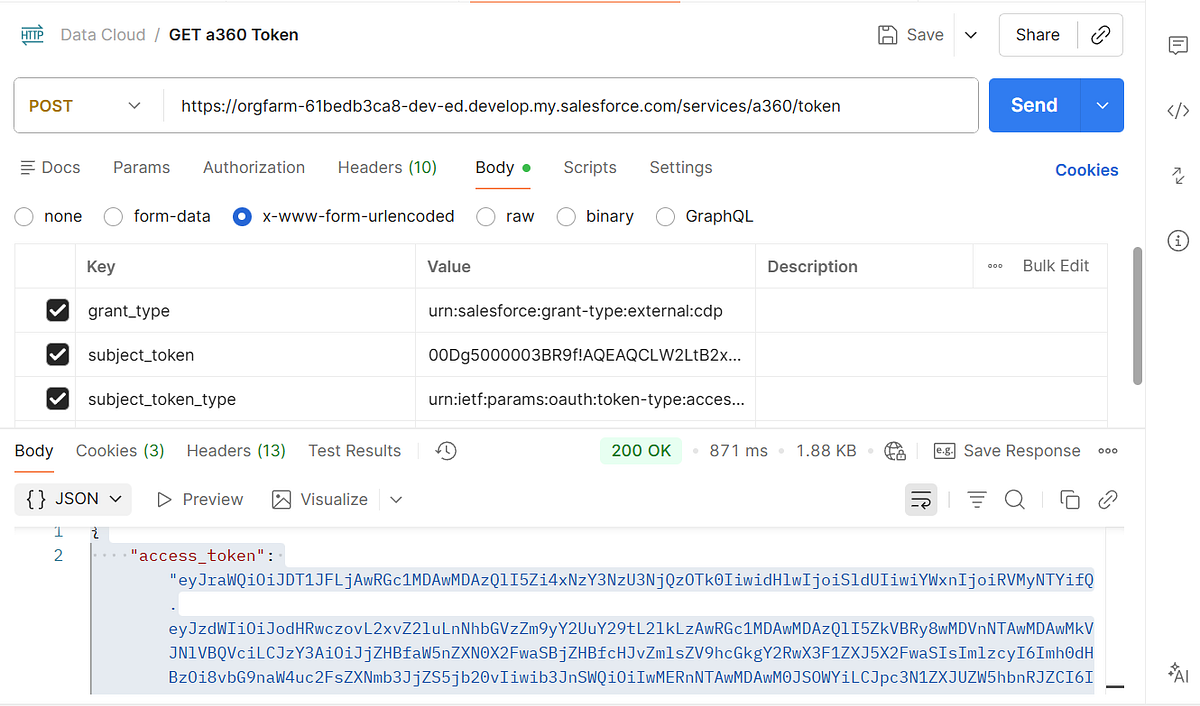
Step 5: Send Data Using the Streaming Ingestion API
Generate Access Token
2. Exchange access token from previous request to get Data cloud token.
Endpoint Structure
POST services/a360/tokenPOST services/a360/token
Example HTTP Request
POST https://orgfarm-61bedb3ca8-dev-ed.develop.my.salesforce.com/services/a360/token
grant_type: urn:salesforce:grant-type:external:cdp
subject_token: <ACCESS_TOKEN>
subject_token_type: urn:ietf:params:oauth:token-type:access_token
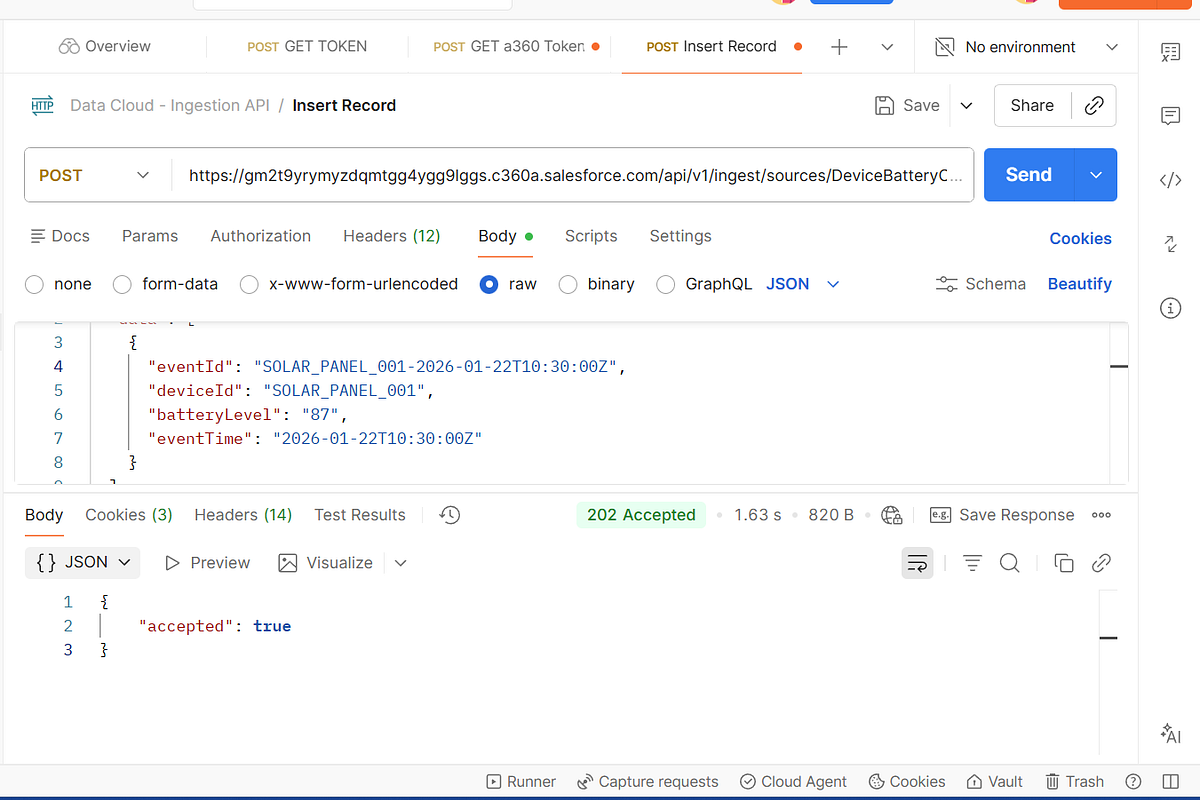
3 Insert Record
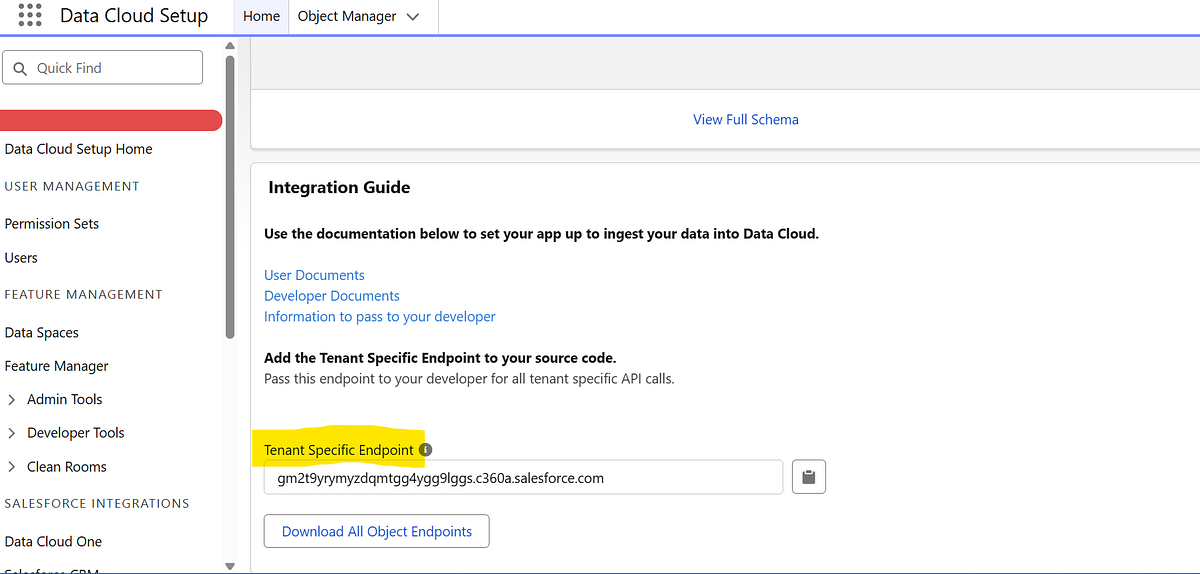
One of the biggest challenges I faced was finding the correct ingestion endpoint. Most Salesforce documentation and tutorials reference generic endpoints like api/v1/ingest/connectors/{connectorName}/{objectName}, but none of those worked for my org.
Eventually, I discovered that Salesforce provides a tenant-specific ingestion endpoint directly in the Streaming Ingestion Connector configuration page, along with a YAML file listing all object-specific endpoints. This tenant endpoint is the only reliable source of truth for your Data Cloud ingestion URLs.
Endpoint Structure
POST <TENANT SPECIFIC ENDPOINT>/api/v1/ingestion/connectors/{connectorName}/objects/{objectName}
Example HTTP Request
POST https://gm2t9yrymyzdqmtgg4ygg9lggs.c360a.salesforce.com/api/v1/ingest/sources/DeviceBatteryConnector/BatteryStatus
Authorization: Bearer <ACCESS_TOKEN>
Content-Type: application/json
Grounding Your Salesforce Agent With Real-World Data (RAG, Chunking, Data Library & More!)
If Part 1 was about understanding what Agentforce is, Part 2 is all about understanding how your agent becomes smart, trustworthy, and actually useful in the real world.
And the secret is Grounding. (Yes, the dramatic capital G is intentional 😄)
Let’s dive in.
🌍 What Is Grounding? (And Why Your Agent Needs It)
Grounding = connecting your AI agent to trusted, authoritative data so it answers based on facts — not imagination.
When you ask an agent a question like:
“What is the refund policy for our subscription product?”
It shouldn’t hallucinate. It should look at:
Your internal Knowledge Articles
Your Pricing policies
Your Product documentation
Your CRM records
Your Product database, etc.
That is grounding.
It tells the LLM: 👉 “Use THIS data only. Stay within THIS reality.”
The Building Blocks of an Agent
Even a perfectly grounded agent needs the right internal structure. Salesforce defines three essential elements that make up an agent:
1. Topics
Define what the agent is responsible for Example: “Refund Requests”, “Appointment Scheduling”, “Order Status”
2. Instructions
Tell the agent how to behave, what to avoid, and what rules to follow Example: “Always verify customer identity before sharing account details.”
3. Actions
Specific things the agent can perform Examples:
Create a Case
Update an Order
Fetch Customer Details
⭐ Connect Actions to Data with Four Mechanisms
Grounding isn’t just about finding the right information — your agent must also know how to use that information when performing real actions. In Agentforce, this connection happens through four powerful data-access mechanisms. Each mechanism tells the agent where the data lives and how it should be retrieved or modified.
These mechanisms act like different “doors” through which the agent can reach your business data, depending on what the task requires.
1️⃣ Grounded Actions — When your data is stored natively in Salesforce
Use Grounded Actions when the agent needs to work directly with Salesforce data you already trust — such as:
Accounts
Contacts
Leads
Cases
Opportunities
Custom objects
Grounded Actions allow the agent to read and write this data safely, using the platform’s built-in permissions and security model. Perfect for CRM-centric tasks like:
“Update the case priority.”
“Create a follow-up task.”
“Find all opportunities closing this month.”
Because the agent uses real Salesforce objects, its decisions stay grounded in accurate, structured information.
2️⃣ Data Graph — When you need connected, contextual information
Sometimes data lives across many related objects. That’s where the Data Graph comes in.
A Data Graph gives your agent a relationship-aware view of your Salesforce data. You define a “graph” of objects and their connections — for example:
Customer → Orders → Order Line Items → Products
Your agent can then reason across the entire graph as a single interconnected dataset.
Useful for:
Customer 360 tasks
Order history analyses
Eligibility checks
Product recommendations
The Data Graph works best when decisions depend on multiple objects connected through relationships.
3️⃣ Actions on CRM and External Systems — When data lives beyond Salesforce
Businesses don’t live in one system, and neither should your agent.
This mechanism allows your Agentforce agent to interact with:
External APIs
Integration platforms
Back-office applications
Custom REST endpoints
Examples:
Fetching shipment tracking from a logistics system
Pulling credit score from a partner API
Checking inventory in a warehouse system
This expands your agent’s capabilities far beyond CRM and ensures it has access to real-time operational data, even if it lives outside Salesforce.
4️⃣RAG: The Heart of Grounding
Retrieval-Augmented Generation (RAG) means the agent:
Receives a user query
Retrieves relevant, real-world data
Uses that data to generate grounded, factual output
LLMs don’t know your business. RAG lets them pull knowledge from YOUR data before generating an answer.
Great for: ✔ precise lookups ✔ numerical or identifier-based queries
Example:
“What is the warranty period for product XYZ123?”
A simple CRM lookup might be enough.
2️⃣ Unstructured Data
Humans love writing. Machines don’t love parsing it. Examples:
PDFs
Policy documents
Web pages
Meeting transcripts
User manuals
Knowledge articles
This is where LLMs shine — but only if you help them access the right parts.
3️⃣ Semi-Structured
A mix. Examples:
JSON
XML
Chat logs
Formatted docs
🔥Most organizations have tons of unstructured content lying around — but it’s rich with answers. RAG makes unstructured data searchable, relevant, and safe to use inside an AI workflow.
📚 Introducing Agentforce Data Library
(Where Chunking, Indexing & Retrieval Live)
Agentforce uses the Agentforce Data Library (ADL) to ingest, transform, index, and prepare your data for retrieval.
Think of ADL as the “data brain” behind your agent.
🔨 How Data Library Works (The Real Magic)
Let’s break it down into digestible steps.
🧩 1. Chunking — Breaking Large Content Into Smart Pieces
LLMs can’t read a 40-page PDF and decide which part is relevant. So ADL automatically chops your documents into smaller, meaningful “chunks.”
Example:
A 20-page Refund Policy PDF → 200 chunks
A product manual → 100 chunks
Each chunk becomes a small searchable unit.
👉 This makes retrieval fast, accurate, and context-rich.
🗂 2. Indexing — Creating a High-Speed Search Layer
After chunking, ADL builds a vector index.
In simple terms:
Each chunk becomes an embedding (mathematical representation of meaning)
These embeddings are placed in an index
When the agent gets a question, it finds the most similar chunks
This is the backbone of RAG.
🧭 3. Retriever — The Engine That Finds Relevant Chunks
The retriever is what actually searches the index.
When a user asks: 👉 “What are the cancellation rules for Enterprise Customers?”
The retriever fetches:
Enterprise contract policies
SLA docs
Pricing schedules
Relevant knowledge articles
These chunks are sent to the LLM along with the prompt template.
⚙️ 4. Setup-Time vs Run-Time — What Happens When?
Setup-Time (When You Configure ADL):
✔ You add data sources (files, knowledge articles, objects) ✔ ADL creates a Data Stream ✔ Chunking happens ✔ Indexing happens ✔ Retriever is prepared ✔ Metadata + mappings are generated ✔ You reference the retriever in your agent’s design
Run-Time (When the Agent Is Live):
User asks a question
Retriever searches the index
Most relevant chunks are selected
Prompt template is filled with these chunks
LLM generates grounded response
Agent returns accurate, policy-compliant output
🧪 A Practical Example — Making a “Refund & Warranty Support Agent”
Imagine you upload:
3 Warranty policy PDFs
50 Knowledge articles
A troubleshooting guide
A CSV of product models
ADL will: 🟦 Chunk PDFs → 700 chunks 🟦 Chunk support documents → 300 chunks 🟦 Create embedding index 🟦 Build retriever 🟦 Allow agent to pull relevant blocks at runtime
Then your agent can answer: 💬 “What’s the refund window for Model Z?” 💬 “Do premium users get extended warranty?” 💬 “Can I return a product without invoice?”
With incredible accuracy — because it uses YOUR content.
AI isn’t just “nice to have” anymore — it’s becoming the engine behind faster decision-making, smoother workflows, and smarter experiences. And at the heart of Salesforce’s AI evolution lies its Agentic AI framework: Einstein Copilot, Prompt Builder, and Agentforce.
This article kicks off my new series on Agentic AI 🤖✨ where I break down concepts, real-world use cases, best practices, and hands-on tutorials.
Welcome to Part 1!
🌟 What Is Agentic AI?
In simple terms, Agentic AI means AI that not only answers questions but takes actions. It doesn’t just respond — it executes, decides, and automates, based on natural language instructions.
Salesforce brings this to life with:
🧠 Einstein Copilot
A conversational AI assistant that lives inside Salesforce and can:
Generate responses
Summarize
Draft content
Pull Salesforce data via grounded reasoning
Execute actions using skills
🧱 Prompt Builder
Configure grounded prompts, connect them with data using Prompt Templates, and test outputs — the bridge between natural language and structured Salesforce logic.
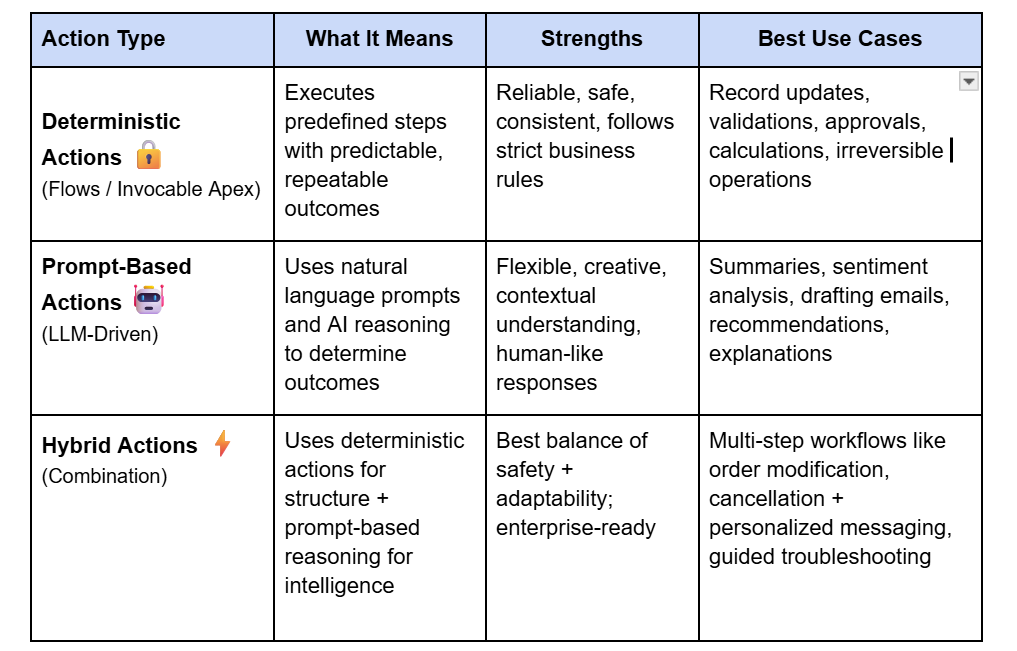
🧭 Deterministic vs Prompt-Based Actions — A Key Design Choice in Agentic AI
As you start building agents, one of the most important architectural decisions you’ll make is choosing between deterministic and prompt-based actions. Salesforce highlights this in the Prototype the Agent Trailhead module, and it’s a foundational part of designing safe, reliable AI systems.
In most real-world solutions, the best approach is hybrid:
Use deterministic actions for high-impact business logic.
Use prompt-based reasoning for contextual understanding, conversation, and content generation.
For example:
“Cancel my subscription” → Deterministic flow handles cancellation → Prompt-based action generates an empathetic message: “We’re sorry to see you go — could you share what didn’t work?”
This balance keeps the agent safe, smart, and human-like — all at once.
I’ll dive deeper into this in the upcoming articles of this series, where we’ll prototype an actual agent step-by-step. 🚀
🧪 Why Salesforce’s Agentic AI Matters
✔ Eliminates repetitive tasks ✔ Makes CRM processes 10× faster ✔ Reduces human errors ✔ Gives business teams autonomy without developer dependency ✔ Allows developers to scale impact with AI-first architectures
And the best part? It’s all native, secure, and trust-layer protected 🔒.
📚 What I Used as Sources
Salesforce Trailhead: Einstein Copilot Basics
Salesforce Docs: Copilot Overview
Salesforce Docs: AI Agent Types & Setup
🎉 Final Thoughts
Agentic AI isn’t the future — it’s the now. If you’re in Salesforce development, architecture, or admin work, this is your moment to embrace the shift.
This article is Part 1 of my Agentic AI Series. Next up: 👉 Part 2: How to Build Your First Einstein Copilot Prompt (Real Example)
Efficient lead management is the backbone of any successful sales process. It ensures that the right prospects are captured, nurtured, and converted into loyal customers. Salesforce provides a full-featured platform to manage the entire lead lifecycle, streamline sales operations, and maintain clean, actionable data.
Here’s a complete guide to the Salesforce lead journey, including tips, steps, and areas where you can take real screenshots.
1️⃣ Understanding the Lead Lifecycle & Sales Funnel
The sales funnel visualizes your leads’ journey — from first contact to becoming a customer. By tracking leads through every stage, sales teams can prioritize efforts and spot bottlenecks.
Key Lead Stages:
New Lead: Captured but not yet contacted
Contacted: Initial outreach completed
Qualified: Ready for conversion
Converted: Successfully turned into a Contact, Account, and Opportunity
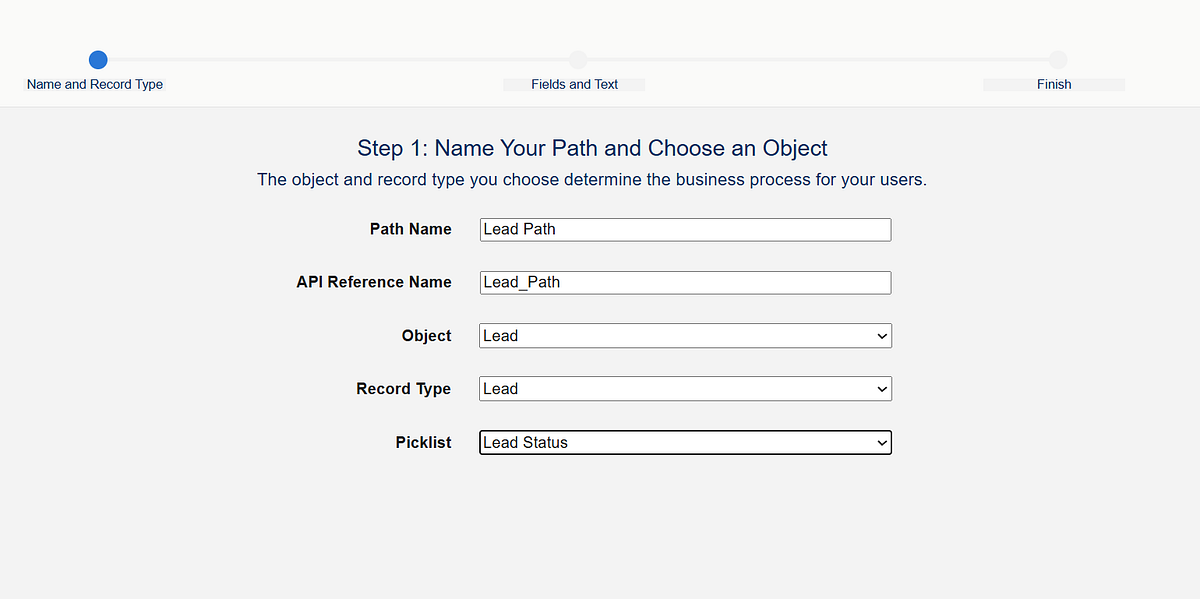
Salesforce Tip: Use Sales Path to visualize lead stages and guide your sales reps.
Setup Steps:
⚙️ Navigate to Setup → Path Settings → Leads
Click New Path, select Lead object, and define stages
Add guidance for success at each stage (best practices, reminders, or checklist)
Activate the path ✅
Lead Path
2️⃣ Lead Capture: Gather Prospects Efficiently
Leads come from multiple channels: 🌐 web forms, 📧 emails, 📱 social media, events, or manual entry. Capturing them efficiently ensures no opportunity is lost.
Salesforce Features:
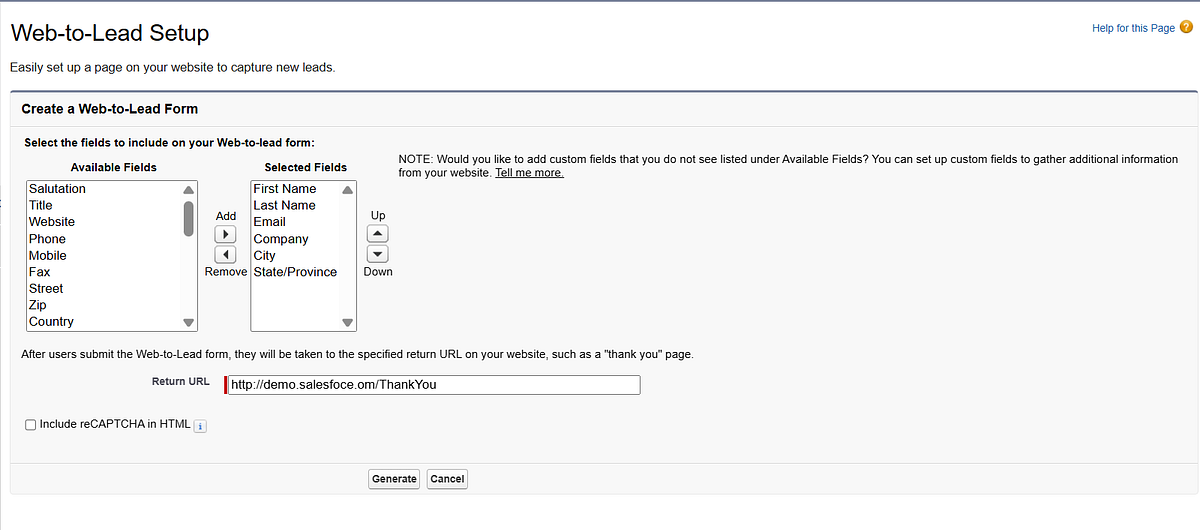
Web-to-Lead Forms: Automatically funnel inquiries from your website
Email-to-Lead Integration: Capture leads directly from inbound emails
Manual Entry: Quickly add prospects through the Lead tab
Setup Steps:
Go to Setup → Web-to-Lead, configure fields and redirect URL
Web-To-Lead Form
2. Connect email or marketing platforms for automatic capture
3. Use the Lead tab → New Lead to manually add prospects
Lead List View
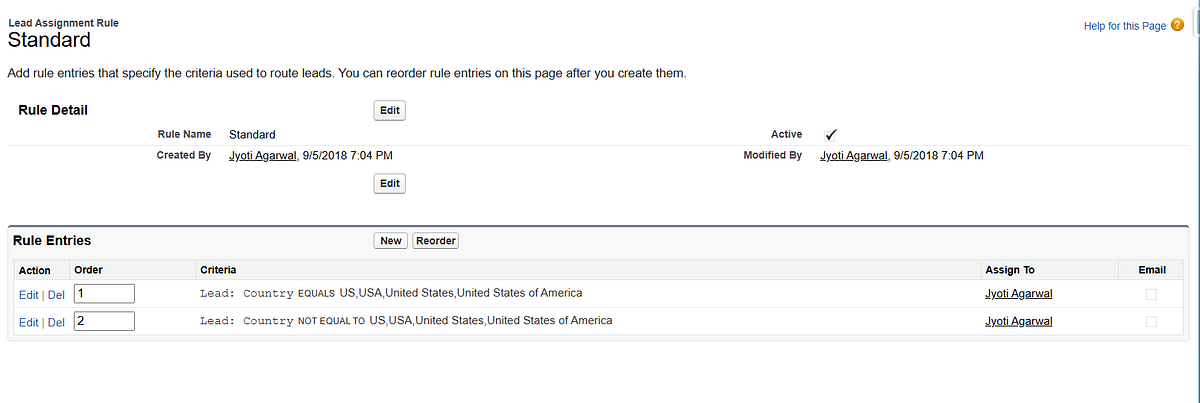
3️⃣ Lead Assignment: Route Leads to the Right Rep
Once captured, leads should go to the right sales rep promptly. Salesforce Assignment Rules automate this, based on territory, product interest, or team structure.
Setup Steps:
⚙️ Setup → Lead Assignment Rules → New Rule
Define criteria (geography, lead source, product interest)
Activate the rule ✅
Best Practice: Combine assignment rules with queues for teams handling high volumes.
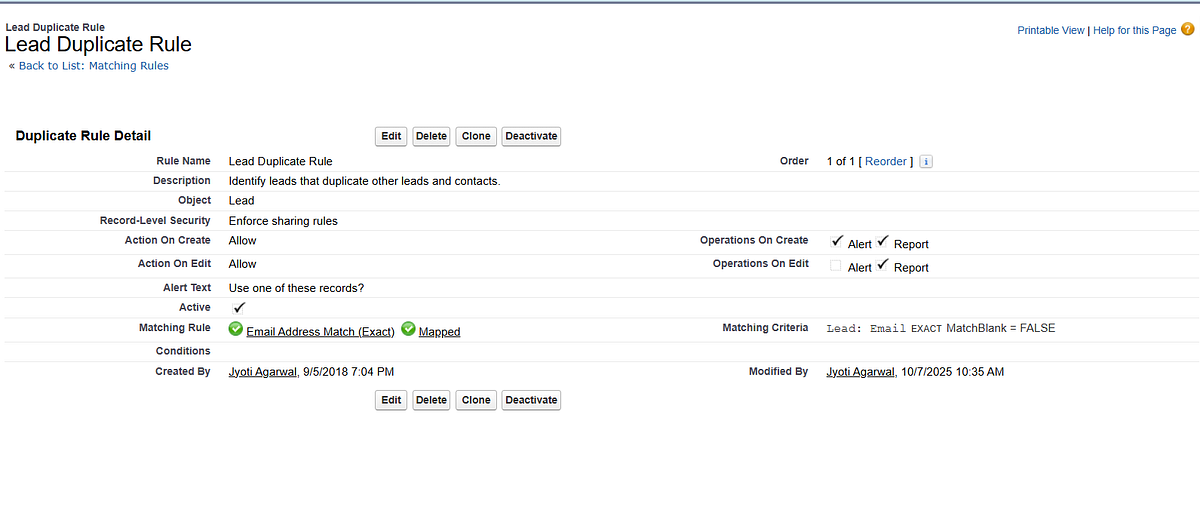
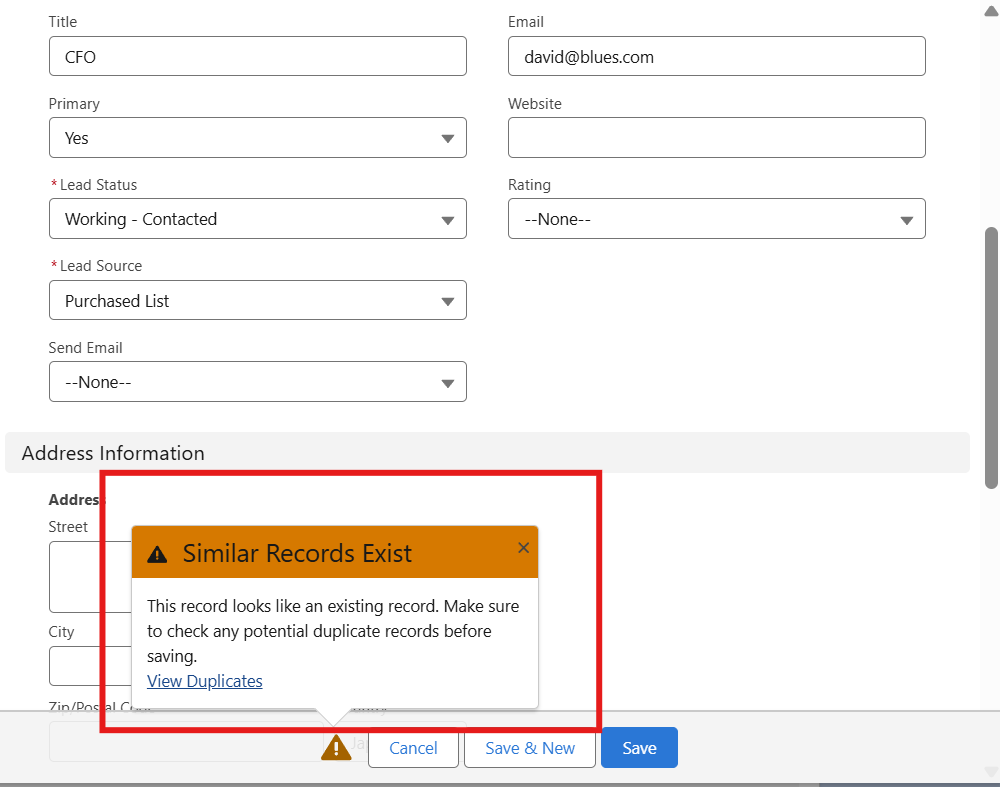
4️⃣ Lead Deduplication: Keep Your Data Clean
Duplicate leads can waste time and confuse your team. Salesforce provides Matching Rules and Duplicate Rules to prevent duplicates and maintain data integrity.
Setup Steps:
⚙️ Setup → Duplicate Rules → Leads → New Rule
Define matching criteria (Email, Company Name, Phone)
Choose action: Alert, Block, or Allow with reporting
Test by creating duplicate leads to verify alerts 🔍
5️⃣ Lead Scoring: Prioritize High-Value Leads
Not all leads are equal. Lead scoring helps sales reps focus on the most promising prospects. Salesforce Einstein or custom formulas can assign points based on:
Engagement (email opens, clicks, website visits)
Demographics (company size, location, role)
Behavioral patterns (product interest, past interactions)
Setup Steps:
For Einstein Lead Scoring: Setup → Einstein Lead Scoring → Enable
Or create custom formula fields to score leads based on activity and criteria
Use list views or reports to filter high-scoring leads for immediate follow-up
Implemented lead scoring using a custom formula field in Salesforce to automatically calculate and prioritize leads based on defined criteria.
6️⃣ Lead Nurturing: Engage Your Prospects
Some leads aren’t ready to convert immediately. Salesforce allows you to nurture leads until they are sales-ready:
📝 Tasks & Reminders: Schedule follow-ups with Salesforce Tasks or Flows
📧 Automated Emails: Use Email Templates, Pardot, or Marketing Cloud for drip campaigns
🗂️ Activity Tracking: Log calls, emails, and notes to maintain engagement history
Setup Steps:
Use Process Builder / Flow to automate follow-ups and reminders
7️⃣ Lead Conversion: Turn Prospects into Customers
When a lead is ready, convert it to a Contact, Account, and Opportunity. Salesforce ensures this process is seamless and maintains data continuity.
Setup Steps:
Open the lead record and click Convert 🔄
Map lead fields to Contact, Account, Opportunity fields
Optionally, assign Opportunity to a specific owner
Lead Conversion popup showing mapping options
8️⃣ Analytics & Reporting: Optimize Lead Performance
Monitoring performance is key to continuous improvement. Salesforce dashboards and reports allow you to track: 📊
Lead source effectiveness
Conversion rates
Response times
Funnel stage drop-offs
Setup Steps:
Navigate to Reports → New Report → Leads
Apply filters and groupings to measure performance
Build dashboards for visual insights and actionable decisions
9️⃣ Conclusion
Salesforce’s lead management features streamline the entire sales journey — from capturing leads to converting them into loyal customers. By implementing:
Assignment rules 🏷️
Deduplication rules 🧹
Lead scoring ⭐
Nurturing flows 💌
Conversion processes 🔄
Analytics dashboards 📊
your sales team can focus on high-potential leads and maximize conversions.
In many enterprises, multiple Salesforce orgs coexist with different roles. One org may serve as the system of engagement, while another holds verified, authoritative data.
Our goal was simple: ensure Org A accounts always had trusted data (such as Company Name, Headquarters, Website, and Industry) by pulling this information from Org B. Instead of users manually checking and updating records, the process had to be automatic, reliable, and scalable.
The CAPIQ Id was used as the unique identifier to match records across the two orgs.
The Approach
1. REST API in Org B (Source Org)
A REST resource in Org B provided verified account data by CAPIQ Id.
@RestResource(urlMapping='/verifiedAccounts/*')
global with sharing class VerifiedAccountsAPI {
    @HttpPost
    global static AccountResponse getAccounts(List<String> capiqIds) {
        List<Account> accounts = [
            SELECT Id, CAPIQ_Id__c, Name, Website, Industry, Headquarters__c
            FROM Account
            WHERE CAPIQ_Id__c IN :capiqIds
        ];

        AccountResponse response = new AccountResponse();
        response.accounts = new List<AccountDTO>();

        for (Account acc : accounts) {
            response.accounts.add(new AccountDTO(acc));
        }
        return response;
    }
}

global class AccountDTO {
    public String capiqId;
    public String name;
    public String website;
    public String industry;
    public String headquarters;

    public AccountDTO(Account acc) {
        capiqId = acc.CAPIQ_Id__c;
        name = acc.Name;
        website = acc.Website;
        industry = acc.Industry;
        headquarters = acc.Headquarters__c;
    }
}
2. Batch Job in Org A (Target Org)
The batch job in Org A orchestrated the enrichment:
New Accounts (created after last run) were picked up.
Flagged Accounts (Get_Data_From_External__c) were refreshed on-demand.
All Accounts were periodically refreshed every 2 days.
Not Found Handling – if no match was found in Org B, the CAPIQ Id was recorded both at the account level (External_Status__c = "Not Found") and centrally in a Custom Setting. These accounts were retried in subsequent scheduled runs.
Partial Updates – we used Database.update(records, false) to ensure one failure didn’t stop the whole batch.
global class AccountDataEnrichmentBatch implements Database.Batchable<SObject>, Database.Stateful {

    Set<String> notFoundIds = new Set<String>();
    Integer successCount = 0;
    Integer failureCount = 0;

    global Database.QueryLocator start(Database.BatchableContext bc) {
        DateTime lastRun = AccountSyncConfig__c.getOrgDefaults().Last_Run__c;
        return Database.getQueryLocator([
            SELECT Id, CAPIQ_Id__c, Get_Data_From_External__c
            FROM Account
            WHERE LastModifiedDate > :lastRun
               OR Get_Data_From_External__c = true
        ]);
    }

    global void execute(Database.BatchableContext bc, List<Account> accounts) {
        List<String> capiqIds = new List<String>();
        for (Account acc : accounts) {
            if (acc.CAPIQ_Id__c != null) {
                capiqIds.add(acc.CAPIQ_Id__c);
            }
        }

        HttpRequest req = new HttpRequest();
        req.setEndpoint('callout:OrgB/verifiedAccounts');
        req.setMethod('POST');
        req.setBody(JSON.serialize(capiqIds));

        Http http = new Http();
        HttpResponse res = http.send(req);

        if (res.getStatusCode() == 200) {
            List<AccountDTO> verifiedAccounts =
                (List<AccountDTO>) JSON.deserialize(res.getBody(), List<AccountDTO>.class);

            Map<String, AccountDTO> verifiedMap = new Map<String, AccountDTO>();
            for (AccountDTO dto : verifiedAccounts) {
                verifiedMap.put(dto.capiqId, dto);
            }

            List<Account> toUpdate = new List<Account>();
            for (Account acc : accounts) {
                if (verifiedMap.containsKey(acc.CAPIQ_Id__c)) {
                   AccountDTO dto = verifiedMap.get(acc.CAPIQ_Id__c);
                    acc.Name = dto.name;
                    acc.Website = dto.website;
                    acc.Industry = dto.industry;
                    acc.Headquarters__c = dto.headquarters;
                    acc.Get_Data_From_External__c = false;
                    acc.External_Status__c = 'Updated';
                    acc.Last_Enriched__c = System.now();
                    toUpdate.add(acc);
                } else {
                    notFoundIds.add(acc.CAPIQ_Id__c);
                    acc.External_Status__c = 'Not Found';
                }
            }

            // Allow partial updates
            Database.SaveResult[] results = Database.update(toUpdate, false);

            for (Database.SaveResult sr : results) {
                if (sr.isSuccess()) successCount++;
                else failureCount++;
            }
        }
    }

    global void finish(Database.BatchableContext bc) {
        AccountSyncConfig__c cfg = AccountSyncConfig__c.getOrgDefaults();
        cfg.Last_Run__c = System.now();
        cfg.Last_Successful_Updates__c = successCount;
        cfg.Last_Failures__c = failureCount;
        cfg.Not_Found_CAPIQ_Ids__c = String.join(new List<String>(notFoundIds), ',');
        upsert cfg;
    }
}
Architectural Flow
┌─────────────┐             REST API            ┌─────────────┐
│   Org A     │  ─────────────────────────────► │   Org B     │
│ (Target)    │                                 │ (Source)    │
│  Batch Job  │  ◄───────────────────────────── │  REST API   │
└─────────────┘          Verified Data          └─────────────┘
       │
       ▼
 Enriched Accounts
 (Updated, Not Found, Failed statuses + Timestamps)
Not Found Resilience – unmatched CAPIQ Ids were tracked and re-attempted in the next scheduled run.
Transparency – each account had a status (Updated, Not Found, Failed) and timestamp for auditability.
Configurable & Future-Proof – Custom Settings controlled field mappings, run stats, and retry logic.
Final Thoughts
This integration wasn’t just about moving data — it was about building a trustworthy enrichment pipeline. With verified data pulled automatically, users in Org A no longer had to cross-check or manually update accounts.
The design ensured:
High-quality data (verified from Org B)
Resilience (partial updates, retries for not found IDs)
Auditability (clear statuses and run stats)
Flexibility (easily extendable to more fields or objects)
When two businesses (or even two departments in the same company) use different Salesforce orgs, collaboration can get tricky. Salesforce-to-Salesforce (S2S) provides a native way to share records across orgs — without writing complex integration code. 🚀
In this article, we’ll explore:
How record sharing works in S2S
Features and limitations
Where S2S can be a quick win (and where it’s not the best fit)
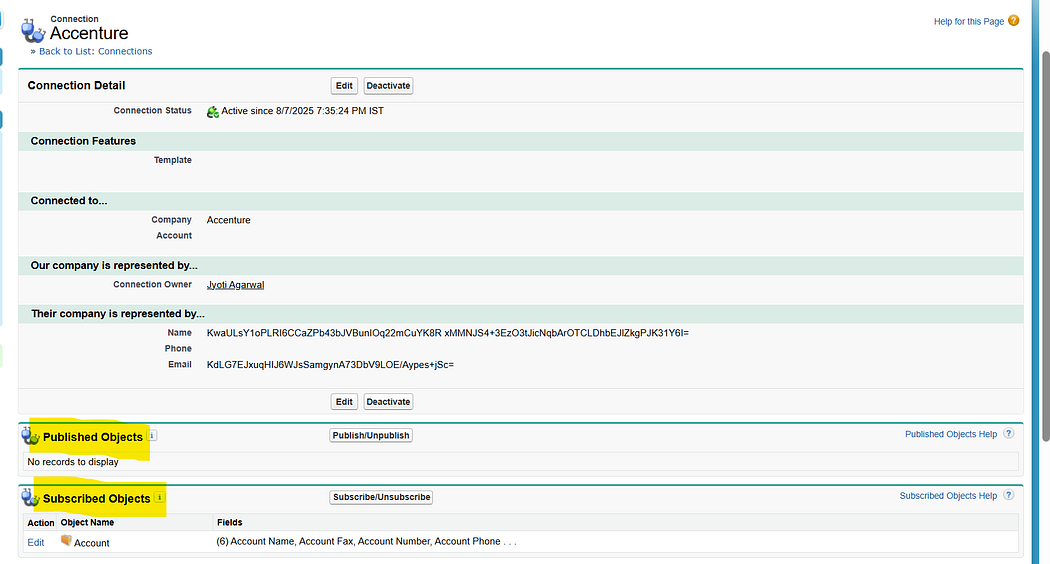
🔗 How Record Sharing Works
Think of S2S as a “handshake” between two Salesforce orgs. Once the connection is set up, you can decide what records you want to share (Leads, Contacts, Opportunities, Custom Objects, etc.) and what fields should be visible.
Here’s the flow in simple terms:
Establish a Connection
Admin in Org A sends a connection invite to Org B.
Org B accepts → connection is live.
Once the connection is established, use the Connections tab to manage partner connections, check status, and start publishing/subscribing objects.
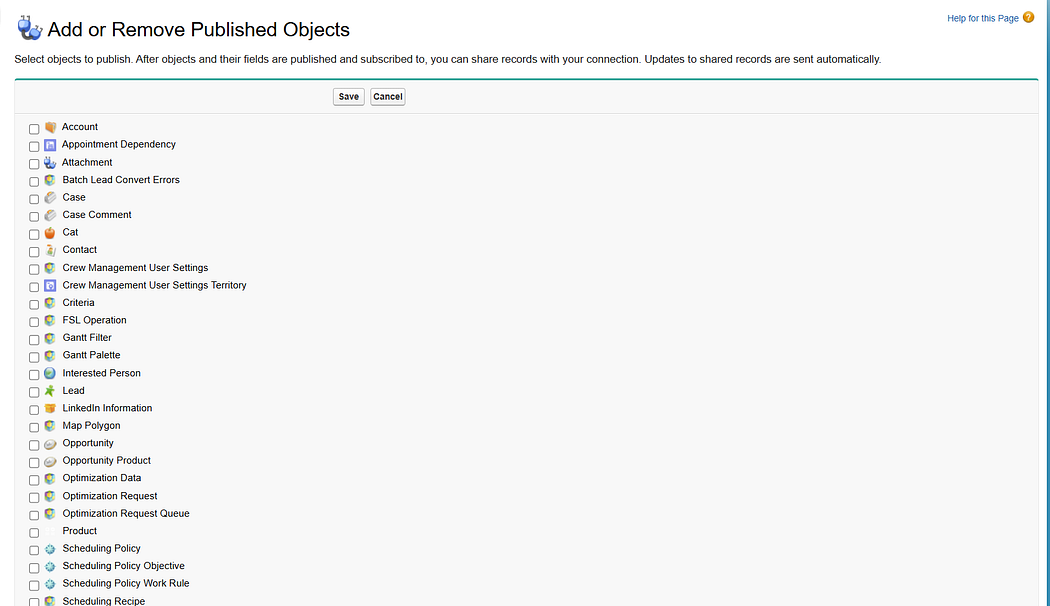
2. Publish & Subscribe
Org A decides which objects/fields to publish.
Org B subscribes to those objects and can configure field mapping for the subscribed fields.
This determines what data will flow across.
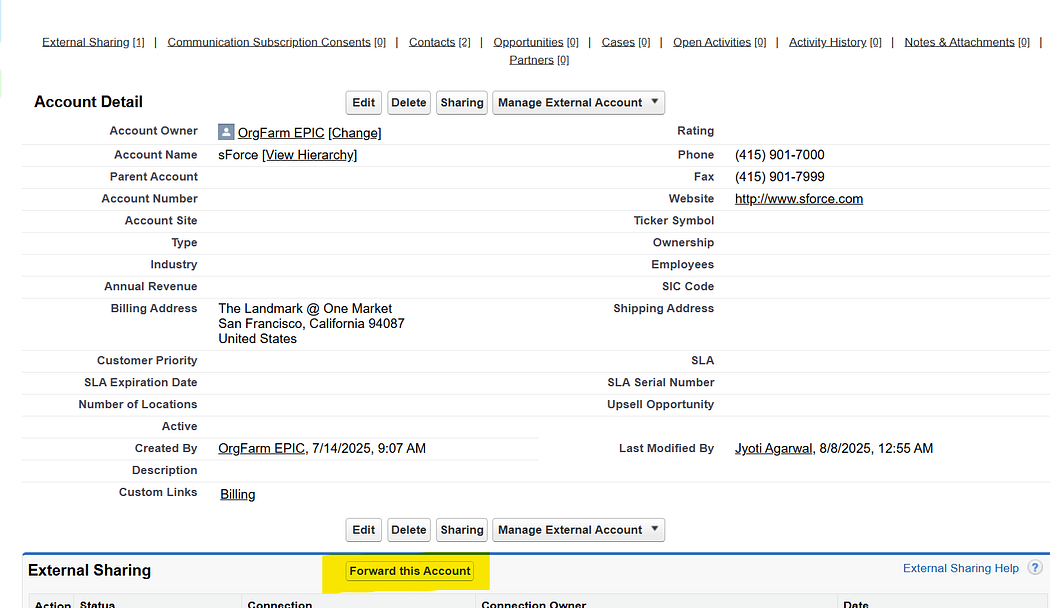
3. Record Sharing
When a record is created/updated in Org A, it must be explicitly shared with Org B.
Shared records appear in Org B as native Salesforce records (with new record IDs). Any updates on the published fields in Org A will automatically reflect in Org B
4. Two-Way Updates (Optional)
If both orgs publish and subscribe to the same object, updates can flow both ways.
Example: A Lead shared by Org A can later be updated in Org B, and the update syncs back.
🌟 Features of S2S
Native Salesforce Experience → Shared records look and behave like normal Salesforce records.
Two-Way Updates → If both orgs publish and subscribe to the same object, updates flow both ways.
Field-Level Control → You can decide which fields are visible to the partner org.
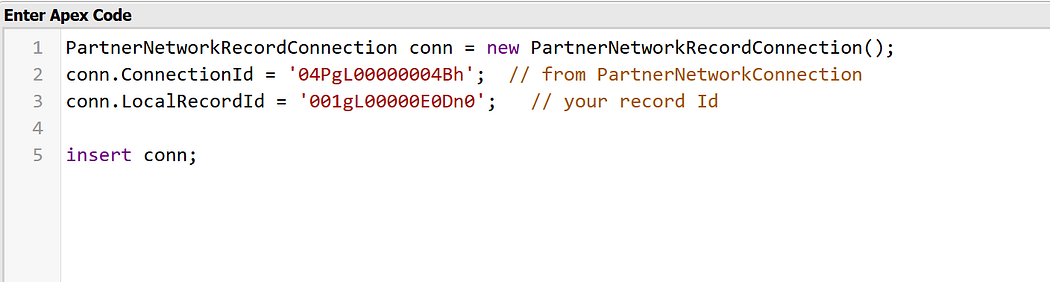
Partner Network Records → Partner network records can also be inserted via the Developer Console, giving admins/devs flexibility during testing or special cases.
⚠️ Limitations of S2S
No Record Matching→ When a record is shared, the subscriber org always creates a new copy with its own Record ID. S2S does not match against existing records, so every shared record is treated as new.
Explicit Record Sharing Required → Records must be manually forwarded or shared programmatically via Apex; no out-of-the-box auto-sharing filters.
Asynchronous Behavior → Delays may occur before shared records appear in the subscriber org.
💡 When to Use S2S
Quick, low-effort collaboration between two Salesforce orgs.
Sharing specific Leads/Contacts/Opportunities with a partner.
When both teams want a native Salesforce experience without middleware.
🚫 When Not to Use S2S
Large-scale data migrations.
Real-time high-volume integrations.
Cases requiring data transformation, deduplication, or complex filtering → APIs, Mulesoft, or custom integrations are better.
✨ Final Thoughts
S2S is like Salesforce’s “plug-and-play” solution for cross-org collaboration. It’s not a full-blown integration platform, but for the right use cases, it’s fast, clean, and easy to set up.
If you’re considering S2S, start small — share a few records, test the workflows, and decide if it fits your business needs before scaling.
💼 Running a small business is no small feat — from managing leads and customers to tracking sales, marketing, and support, there’s a lot on your plate. That’s where Salesforce comes in. 🚀
✅ Here’s how Salesforce empowers small businesses:
1. Stay Organized with CRM 🔍 Salesforce helps you track every customer interaction — no more juggling spreadsheets or sticky notes.
2. Automate Routine Tasks⚡ From sending follow-ups to assigning leads, let Salesforce do the heavy lifting while you focus on growing your business. 🤖
3. Smart Insights & Reports 📊 Make informed decisions with dashboards and reports that show what’s working and what’s not. 📈
4. Access Anytime, Anywhere 📲 Manage your business on the go with Salesforce’s mobile-friendly platform. 🌍
5. Scale as You Grow 👫 Start simple, then add features as your business expands — Salesforce grows with you! 🌱
💡 Real-Life Use Case:
Imagine you run a boutique clothing brand. With Salesforce, you can:
👗 Track customers and their preferences 💌 Send automated offers 📦 Manage orders and delivery updates 📣 Launch targeted marketing campaigns
All from a single dashboard!
🧠 Final Thoughts
Salesforce is not just for big enterprises. It’s an investment in productivity, customer satisfaction, and business growth. 🌟
Thinking of implementing Salesforce for your business? You’re already on the right track! 💻
From debugging workflows at midnight to helping businesses automate their processes, my Salesforce journey has been nothing short of transformative.
I started Cloudivaa as a space where I could share my experiences — the good, the confusing, and the game-changing — as I continue to grow in the world of Salesforce. But before I get into what this blog will be about, let me share how I landed here.
💻 From Curiosity to Cloud
I didn’t always know I wanted to work in tech, let alone in Salesforce. Like many others, I stumbled upon it while exploring career options that offered flexibility, global demand, and the ability to solve real-world problems.
What started as curiosity soon became a passion. The more I worked on Salesforce — learning Apex, building automation flows, creating reports, customizing UIs — the more I realized how powerful and versatile the platform is. And more importantly, how empowering it can be, especially for someone who wants to blend creativity with technical problem-solving.
☁️ Why I Started Cloudivaa
As I continued to learn, I found myself constantly Googling, experimenting, and testing small things that aren’t always documented clearly. That’s when it hit me — what if I could create a space to share these lessons with others?
Cloudivaa was born from that idea. A simple blog that helps:
Beginners understand Salesforce concepts
Professionals discover real-world solutions
Anyone looking for career tips, motivation, or quick tutorials
It’s my little corner of the internet — for now — but I hope it becomes a helpful resource for anyone navigating the Salesforce cloud, especially women and newcomers.
✨ What You’ll Find Here
This blog will include:
Step-by-step Salesforce tutorials
Lessons from real projects
Personal reflections on being a woman in tech
Career tips and productivity hacks
Notes on what I’m currently learning
Whether you’re a complete beginner or someone who’s already in the ecosystem, I hope you’ll find something here that inspires or supports your journey.
💬 Let’s Connect
I’m excited (and a little nervous!) to put myself out there. If you’re reading this — thank you. Feel free to leave a comment, ask a question, or just say hello.
And if you’d like to know more about me, click here to check out the About page.
Here’s to building, learning, and growing — one cloud solution at a time. 🌥️